Understanding AWS CDK: Infrastructure as Real Code
Introduction
AWS CloudFormation gave us infrastructure as code. AWS CDK gives us infrastructure as real code.
The AWS Cloud Development Kit (CDK) lets you define cloud infrastructure using programming languages you already know — TypeScript, Python, Java, C#, Go — instead of writing hundreds of lines of YAML or JSON templates. You get loops, conditionals, abstractions, IDE autocomplete, and the full power of your language’s ecosystem.
But CDK isn’t just “CloudFormation with better syntax.” Its construct model introduces a layered abstraction system that fundamentally changes how you think about composing infrastructure. This article breaks down the key concepts you need to understand to use CDK effectively.
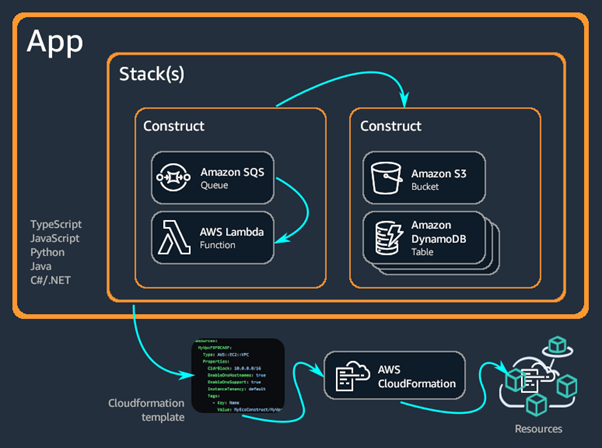 CDK apps are composed of Stacks containing Constructs, which synthesize into CloudFormation templates and deploy as AWS resources.
The Construct Model: Three Levels of Abstraction
Everything in CDK is a construct — a building block that represents one or more cloud resources. Constructs come in three levels, and understanding these levels is the key to working with CDK productively.
L1 Constructs: The CloudFormation Layer
L1 constructs are direct, one-to-one mappings to CloudFormation resources. They’re prefixed with Cfn (e.g., CfnFunction, CfnBucket) and require you to specify every property explicitly — just like writing CloudFormation, but in your programming language.
1
2
3
4
5
6
7
8
9
10
11
12
// L1: Verbose, explicit, full control
CfnFunction cfnFunction = new CfnFunction(this, "MyCfnFunction", new CfnFunctionProps {
    Code = new CodeProperty {
        S3Bucket = "my-bucket",
        S3Key = "my-code.zip"
    },
    Role = "arn:aws:iam::123456789012:role/my-role",
    Runtime = "nodejs18.x",
    Handler = "index.handler",
    MemorySize = 256,
    Timeout = 30
});
You’ll rarely use L1 constructs directly. They exist as an escape hatch for when higher-level constructs don’t expose a property you need, or when a new AWS feature hasn’t been added to L2 constructs yet.
L2 Constructs: The Sweet Spot
L2 constructs are where CDK shines. They provide sensible defaults, convenience methods, and grant-based security — dramatically reducing boilerplate while keeping you in control.
The same Lambda function as an L2 construct:
1
2
3
4
5
6
7
8
9
// L2: Concise, smart defaults, convenience methods
Function fn = new Function(this, "MyFunc", new FunctionProps {
    Runtime = Runtime.NODEJS_18_X,
    Handler = "index.handler",
    Code = Code.FromAsset("./lambda")
});

// Grant the function read access to a bucket — one line
bucket.GrantRead(fn);
The difference is dramatic. L2 constructs automatically create the IAM role, configure logging, and set reasonable defaults for memory, timeout, and retry behaviour. They also expose methods like GrantRead(), AddEnvironment(), and AddAlias() that make common operations trivial.
L3 Constructs: Patterns
L3 constructs, called patterns, compose multiple resources into common architectural building blocks. They represent entire solutions rather than individual resources.
1
2
3
4
5
6
7
8
9
// L3: An API Gateway backed by a Lambda — fully wired
LambdaRestApi api = new LambdaRestApi(this, "MyApi", new LambdaRestApiProps {
    Handler = backend,
    Proxy = false
});

Resource items = api.Root.AddResource("items");
items.AddMethod("GET");    // GET /items
items.AddMethod("POST");   // POST /items
You can spot L3 constructs by their names — they typically combine multiple service names: ApplicationLoadBalancedEc2Service, QueueProcessingFargateService, NetworkLoadBalancedEc2Service.
Building Your Own Constructs
The real power of CDK is that you can create your own constructs, composing lower-level constructs into reusable, domain-specific abstractions:
1
2
3
4
5
6
7
8
9
10
11
12
13
14
public class NotifyingBucket : Construct
{
    public NotifyingBucket(Construct scope, string id, NotifyingBucketProps props = null)
        : base(scope, id)
    {
        var bucket = new Bucket(this, "Bucket");
        var topic = new Topic(this, "Topic");

        bucket.AddObjectCreatedNotification(
            new SnsDestination(topic),
            new NotificationKeyFilter { Prefix = props?.Prefix }
        );
    }
}
Every construct takes three parameters:
- scope — The parent construct (usually
this) - id — A unique identifier within the scope
- props — Configuration (optional)
This is composition all the way down. Your custom L3 uses L2s, which use L1s, which produce CloudFormation. Each layer hides complexity from the layer above.
The Construct Tree and Resource Identity
CDK builds a construct tree — a hierarchy of all constructs in your stack. This tree determines how resources are identified.
Logical IDs
CloudFormation requires unique logical IDs for every resource in a template. CDK generates these automatically by concatenating the path through the construct tree plus an 8-digit hash.
For example, a queue construct at path Queue > customer-coupon-request-DLQ gets the logical ID QueuecustomercouponrequestDLQCF3F2E41.
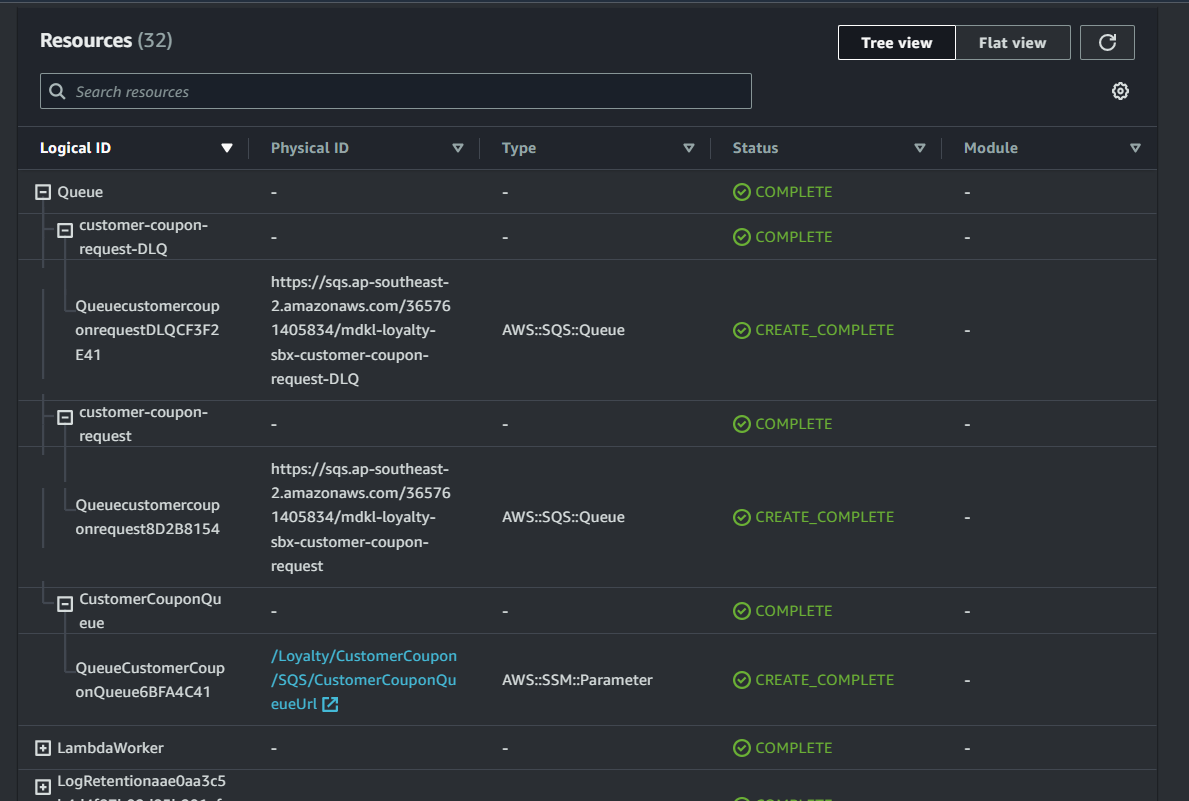 The CloudFormation console’s tree view shows how construct paths map to logical IDs and physical resource names.
Critical rule: never change the logical ID of a deployed resource. CloudFormation treats a changed logical ID as a delete-and-recreate operation, which can cause data loss or service interruption. This means: don’t rename constructs or restructure your tree after deployment without understanding the consequences.
Physical Names
Physical names are the actual names of resources in AWS (e.g., an S3 bucket name). You can set them explicitly:
1
2
3
var bucket = new Bucket(this, "MyBucket", new BucketProps {
    BucketName = "my-bucket-name"
});
But you generally shouldn’t. Hardcoded physical names prevent CloudFormation from replacing resources when immutable properties change — you’ll get a deployment failure that can only be resolved by deleting the entire stack. Let CDK auto-generate names unless you have a specific reason not to.
Environments and Deployment
Each stack targets an environment — an AWS account and Region pair. You can hardcode it, derive it from environment variables, or leave it unspecified (environment-agnostic).
1
2
3
4
5
6
7
8
9
10
11
12
13
14
15
// Flexible: uses CLI profile by default, overridable via env vars
Amazon.CDK.Environment MakeEnv(string account = null, string region = null)
{
    return new Amazon.CDK.Environment
    {
        Account = account
            ?? Environment.GetEnvironmentVariable("CDK_DEPLOY_ACCOUNT")
            ?? Environment.GetEnvironmentVariable("CDK_DEFAULT_ACCOUNT"),
        Region = region
            ?? Environment.GetEnvironmentVariable("CDK_DEPLOY_REGION")
            ?? Environment.GetEnvironmentVariable("CDK_DEFAULT_REGION")
    };
}

new MyStack(app, "prod", new StackProps { Env = MakeEnv() });
For production: always specify the environment explicitly. Environment-agnostic stacks can synthesize differently depending on who runs the build — acceptable during development, but an anti-pattern for production deployments.
Bootstrapping
Before deploying to any environment, you need to bootstrap it — a one-time setup that creates an S3 bucket for assets and IAM roles for deployment:
1
cdk bootstrap aws://123456789012/us-east-1
Each account/region combination must be bootstrapped separately.
Context: Caching and Reproducibility
CDK uses context values — key-value pairs cached in cdk.context.json — to store information retrieved from your AWS account during synthesis (like availability zones or VPC configurations).
This caching ensures reproducible deployments. Without it, a new availability zone appearing in your region could silently change your infrastructure.
Important rules:
- Always commit
cdk.jsonandcdk.context.jsonto source control - Never edit
cdk.context.jsonmanually - Use
cdk contextto view cached values - Use
cdk context --reset <number>to force a refresh of specific values
Getting Started
Install the CDK CLI globally:
1
npm install -g aws-cdk
Create a new project:
1
2
mkdir my-infra && cd my-infra
cdk init app --language csharp
From here, you define constructs, synthesize CloudFormation templates with cdk synth, and deploy with cdk deploy.
Key Takeaways
- Use L2 constructs by default. They handle IAM, logging, and sensible defaults. Drop to L1 only when you need a property that L2 doesn’t expose.
- Build custom constructs for your domain. Encapsulate your company’s patterns — a “standard API” or “monitored queue” construct — so teams get consistent, pre-configured infrastructure.
- Never change construct IDs after deployment. It causes resource replacement, which can mean downtime or data loss.
- Avoid hardcoding physical names. Let CDK generate them unless you have a cross-stack or cross-account reference that requires a known name.
- Always specify environments for production stacks. Environment-agnostic stacks are convenient for development but unpredictable for production.
- Commit your context files. They’re part of your application state and ensure reproducible deployments.